neděle 23. června 2013

101 Bracelets

At last warm days came even to Prague. And with shiny sun the colors invaded streets of the city.
Neon green, fluorescent yellow, ocean blue... What is your favorite?
Summer is the best season to show all colors, which are in you, which describes your personality.
Colorful dresses, shoes and accesories will make you feel yourself... and in addition all looks will be pointed only at you;)

Today I will show here some ideas for bracelets, which are amazing accessories for summer looks.

This bracelet I saw on blog of one creative person, you can check it here as well:
http://li-dali.blogspot.cz/2012/10/my-new-diy-bracelet.html

In fact I love the idea, but those colors are not my cup-of-tea. However the plus of DIY thing is right here: you can do whatever you want. The things you will need are just cotton fibres and chainelets with/without crystals. You can make one colour bracelet or you can try to create unbelivable color creations. 

This bracelet is very popular now. None of stylish teenage or young looks misses it.

Again- nothing difficult, but hundreds of possibilities, how to do it your way. 
You can check photo-manual here: 
http://ivona.bigmir.net/beauty/trands/345424-Braslety-svoimi-rukami--Delaem-ukrashenie-s-nitkami-muline


This one is so very special, that I will definitely need to try it. 
All you need is zipper;) 
Challenge accepted!

And you you feel like real handycraft guru, i have another challenge here.

With lots of patience, some felt and beads you will be the owner of this "Great Gatsby" style accessory.

Try and post your creations!


pátek 21. června 2013

Supernatural flat

Lately I checked hundreds of flats and houses pictures, as the time has come to find our own place.  Flat is still nowhere to be found, however I spoted a lot of crazy ideas for interier decoration, so I would like to share with you the ideas I loved.

I know, that at the moment simplicity an crystal clear design is IN. However with all those stylish kitchens in metalic and all this functional design, the appartment looses it´s human soul. It feels clean, but empty...

Here I choose some ideas, which you can call crazy, childish... whatever... Those are the things, which come to your house, have emotional link with you and your family and make you really feel AT HOME.

For people, who wants to be at time everywhere on Earth... Or to know right time to call your friends and families far away from you

Fan of handycraft, are you? This is perfect thing to calm your nerves, spend long winter evening and decorate your living room walls:)


Yeepee:) Desigual style chairs-hand made patchwork

I am an eggman, they are the eggmen...


"Darling, have you thrown out the garbage?"
"Sweety, there are fishies on it, I don ´ t think I have heart for this":)
Lighting cup? Something for Mad hatter


For wine and succulents lovers

Benjamin Button, say you....


Tennis lovers


Better than feeding pigeons:)


And what are your favorite designes for appartment? Share with me!;)


pondělí 17. června 2013

Fridgestyler


Have you ever imagined, that your refrigerator can be not only food-saver or background for your holiday magnets?

Just check out what crazy masterpieces can make their way to the fridge door:

This horrifying Fridgezilla


Or this diet addict

And what about you, are you a night-eater?


Than, may the Fridge be with you:)


Any of your crazy ideas can be put on snowhite background of fridge, just be sure to use erasable markers:)


sobota 15. června 2013

Creative glow

Soo, long time no see:) Hope you were missing my new article. And here you are.

Checking some creative websites I found really special idea to decorate your room and make it cosy ...at night:)
Some people put glowing stars on ceilling (like my bf did-it is just brilliant, we have night sky with all constellations. Sometimes after crazy parties I jst keep staring at it. Deffinitely will try to take a picture of it), some people buy lava-lamps. I propose to use things, which anyone can find at home-glass bottles, jam jars etc.

Looks nice,right? And simple indeed. All you need: few bottles or other glass containers, glowing paint, brush and a pair of creative hands.

The working steps are simple as well.

1) You need to wash the bottle carefully and let it dry for an hour or two. Prepare your glowing paint. I saw this type in our art-shops:


2) After it is dry completly, start to put the paint on the inside of the bottle-that will provide more secure background for it and the paint will not be damaged easily.


3) let it dry as well and your lamp is ready. 
You can put the bottle to some sunny place during the day, or if you have bad luck for weather, light bulb will work perfectly as well.


Enjoy your special space glow artefact.


pondělí 10. června 2013

Ebru? What is it?


Hi all,
today I would like to present very interesting technics of decorating called Ebru


Just a small pre-story:

Today is my birthday and my working colleague from Turkey prepared a very special gift. At first I couldn't identify, what was the picture made of, but then I recognized, that it was a ceramic tile with very tasty oriental flower design on it. That was Ebru decoration.

So, what is EBRU or Turkish marbling?

Besides Turkish women name, "Ebru" stands for special technique of paper/tile marbling.
The meaning of "ebru" is not really clear, but some specialists say  it comes from:
1) ancient Persian language,where this word means "Cloud and Wind"
2) Ottoman language it means "Clouded Paper" or "Colorful"
3) some other sources say that the meaning of "Abri" (Ebru) is "Pure Water" or "Clean Water"

This technique can be also found in Japanese calligraphy, where it is called Suminagashi, which means "floating ink" (I hope:) and in Chinese "Four Treasures of the scholar's study" (10th century), where are notions of decorative paper called 流沙箋 meaning “drifting-sand” or “flowing-sand notepaper".

I will not make an essay on history, because this technique is too old and it's origin is not to be found in sand of ages. If it will interest you, you can always find a lot of materials on Internet (thanks God we have it... or Wikipedia makes you Brain king).
However I would like to make a note about used materials, which are very interesting.

So, what do you need for making Ebru?
First of all you need water. But the water has a secret in it. It should be dense liquid, which will not let the color pigments to spread all over. To dense the water Turkish artists uses tragacantha, natural gum, or ox bile (which smells really bad and have to be added to boiling water).

Secondly you need a tub, where you will poor the water and let it stay for about 24 hours. Size of tubs that are used today is 35x50cm and A3 paper sizes. The depth is 4-6 cm.

Pigments: they are all natural and preparation recipes are guarded by generations.

Brushes are made of horse hair and  rose branches.

This art is very complex and it is difficult to find words to describe it, so I recommend: just watch the video and plunge in simple and accurate gestures of ebru-master Seyit UYGUR
It is just perfect.


pondělí 3. června 2013

Superb art

Now let me show you something awesome!!!
 Check out this picture.
 Can you find out what is it?


All those small details... This is another face of quilling!!:) Quilling is not only flowers and spirals, it can also bring to world such sophisticated works, as the one on top.

Thanks to perfect artist Yulia Brodskaya, who gave us this pleasure to look at her works.
You can check other of her works on http://www.artyulia.com 

As for quilling, this art will definitely be next chapter in my creative diary. I just need to try it.


Pallet art

Pallets are used for a long time by different designers to create tables, sofas, chairs, benches etc. No wonder. Pallets are mostly made of rather good wood, because they have to be strong enough to transport at least a tonne of product on it.
You can have different types of pallets: Euro pallets 120x80 cm, CP1, you can also make customized pallets. If you have a friend in logistics or warehouse storage branch, he will tell you a lot of interesting things about them.

As for material, pallets give you a lot of place for your creativity, because they can be made of softwood (wood from gymnosperm trees such as conifers) or hard wood (oak is good example).

For furniture you would rather prefer to use new pallets, and make sure it has phytosanitary mark on it (it will certify, that your pallet is treated with special solution, which will kill all wood parasites inside the wood and your creative piece will endure time changes).
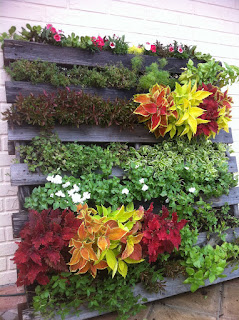
But today I will not talk about making chairs and tables, but something more pleasant for gardening fans.
Today we will make creative flower tub.

You will need:
1. one pallet (we had standard Euro pallet 120x80 cm, already used)
2. protective varnish for wood
3. gardener foil (we have rather thick (about 3 mm) black foil, which make the body of our flower tub)
4. gardener stapler
5. Saw, which will help you to transform your pallet as you wish
6. flowers and corresponding soil depending on your taste:)
7. drain (small stones for example), which you put on bottom of your tub to provide water flow-off.

Now we can start.

First off all you need to decide, where you will put your pallet garden. For me it was decided in a few moments. I decided to adorn our cat house.
For this purpose I needed only a half of my pallet:

     whole pallet against leftover:)


So I prepared my piece, but it needed some more transformations, because distances between wooden parts were too small. So we cut some parts out and here is the end version:

I decided to brush some parts with acrylic paint. I used dark red to make some illusion of  "red wood":)
After the paint dried, we put on protective varnish, because our flower tube will be outside and without protection all our efforts will be gone in few weeks of rains. You better put two layers of varnish, it will make no harm.

When the varnish is fully dry (it took us few days), you can start to prepare the body of your flowerpot.
Take the foil and put it on the bottom of pallet.

There is a simple way to put it on(you can fasten it directly on sides of pallet, but it will ruin the exterior construction specialty of pallet):


We have chosen another way:
you put and fasten the foil inside the pallet construction (you will see better the effect on final version):
So, when the foil is fastened, you should put your flower tub on the place, where you want it to stay, because when you fill it with soil, you never lift it again (of course excluding the case when you eat spinach and become Popeye the sailor:). 

You prepare your drain, soil and flowers and start your gardener work:

At the bottom you place drain (in my case some sand with small stones), then you put in enough soil and flowers. Your pallet garden is ready now, just don' t forget to add some water.

You can add a lot of your own creativity to this simple process. And if you have few space (maybe some balcony), you can even make hanging gardens of Semiramis with your own hands:
Add your own creations or ideas. Gardeners of the world will thank you:)


neděle 2. června 2013

Hair felt in interier design

Working with felt is traditional Russian handicraft. Now I want to show, how this traditional material of "valenki" is used in modern houses.


Few days ago I was impressed by soft carpet. It looks exactly like sea stones, warmed by sun, which will remind you of vacations during long winter days.


Look is fabulous, right?
So now we are coming to "how to make it?"
For this object you can use carded wool. It is cheaper and the fibres are situatedin different directions, which makes work with it much easier (and you will need no special felting tools).

For felt stones you will need grey, light grey and some cream/white material.

First of all, you need to form your stone. For that take a piece of felt and knead it in your arms. The volume of your stone will reduce afterwards, so make sure you used enough of material.
As you know, the stones are all different, so use your creative mind to put on other colors and make it look natural.
For big stones the steps are a little bit different. The greatest difference is, that you need to make a felt case, which will be filled from inside. Otherwise your use of material will be gigantic and you will need your own sheep flock:)

Now, when you have your dry woolen ball prepared, you need to put it in warm soapy water for few moments. Soap helps linking woolen fibers and as a result you will get smooth surface.  After that, you take it out and start forming your stones with your hands. Remember - nature do not like regular forms, so make sure your stones have different shapes.

When your stones are ready, put them in cold clean water and then wring out the water. Repeat this procedure until you can see, that all the soap is washed away.

Dry your stones and use them as home decoration or make nice carpet by linking the stones together.

Have fun:)
Second chance for you nail polish 

Any girl (or maybe some guys as well) has this problem with nail polish:
you buy it, you use it for some weeks or months and you still have a residue, which cannot be used for original purpose.
Now you have two ways: either throw it away, or try to turn it into something special.
I would choose the second way.
As you know, pretty flowers and romantic style are really in trend this Spring, and will stay in Summer.
Very simply you can make very fashionable accessories.
You will need:
1. thin wire in silver or bronze colour - those look most pretty
2. nail polish, which has less liquid consistence, than at the beginning, but is not absolutely dry
3. pair of tongs


3. A sponge or a bowl with rice seeds, where you can pin the flower for drying.

And here we start.
First step will be making our flowers' petals. For that we will take small pieces of wire (about 6 cm long). Then we put two ends and twist them with tongs. We will obtain an eyelet. You can make each petal separately or you can try a whole flower, as on picture below:


 Personally I prefer to make them separately, but it is anyone' s choice:)

Second step will be working with nail polish, so take some pad, which you are not afraid to spoil.
Take your petal/flower and drag the brush with nail polish on each petal. You need to cover the whole space, because otherwise the film will not be created. On the beginning it is simpler to cover smaller petals.


Third step: After the thin film of nail polish is on, put your flowers into a bowl with rice seeds or a sponge and let them 3-5 min. to dry. Then make another layer, and repeat the action until you get the thickness and color you like.
And here you have it. Sweet and very delicate accessory can be great decoration for a headband, broach or anything, what will come to your mind.


Hope you like this lesson. Will be glad to see your creations.

The best way to  end this lesson is to use Nike's slogan: Just do it :]

PS. need to say, that I do not know the creative person, who first invented this working method, so I cannot give the reference. However thanks a lot to him/her.