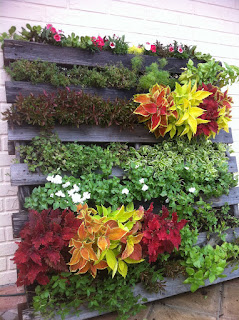
Pallets are used for a long time by different designers to create tables, sofas, chairs, benches etc. No wonder. Pallets are mostly made of rather good wood, because they have to be strong enough to transport at least a tonne of product on it.
You can have different types of pallets: Euro pallets 120x80 cm, CP1, you can also make customized pallets. If you have a friend in logistics or warehouse storage branch, he will tell you a lot of interesting things about them.
As for material, pallets give you a lot of place for your creativity, because they can be made of softwood (wood from gymnosperm trees such as conifers) or hard wood (oak is good example).
For furniture you would rather prefer to use new pallets, and make sure it has phytosanitary mark on it (it will certify, that your pallet is treated with special solution, which will kill all wood parasites inside the wood and your creative piece will endure time changes).
But today I will not talk about making chairs and tables, but something more pleasant for gardening fans.
Today we will make creative flower tub.
You will need:
1. one pallet (we had standard Euro pallet 120x80 cm, already used)
2. protective varnish for wood
3. gardener foil (we have rather thick (about 3 mm) black foil, which make the body of our flower tub)
4. gardener stapler
5. Saw, which will help you to transform your pallet as you wish
6. flowers and corresponding soil depending on your taste:)
7. drain (small stones for example), which you put on bottom of your tub to provide water flow-off.
Now we can start.
First off all you need to decide, where you will put your pallet garden. For me it was decided in a few moments. I decided to adorn our cat house.
For this purpose I needed only a half of my pallet:
 whole pallet against leftover:)
So I prepared my piece, but it needed some more transformations, because distances between wooden parts were too small. So we cut some parts out and here is the end version:
I decided to brush some parts with acrylic paint. I used dark red to make some illusion of "red wood":)
After the paint dried, we put on protective varnish, because our flower tube will be outside and without protection all our efforts will be gone in few weeks of rains. You better put two layers of varnish, it will make no harm.
When the varnish is fully dry (it took us few days), you can start to prepare the body of your flowerpot.
Take the foil and put it on the bottom of pallet.
There is a simple way to put it on(you can fasten it directly on sides of pallet, but it will ruin the exterior construction specialty of pallet):

We have chosen another way:
you put and fasten the foil inside the pallet construction (you will see better the effect on final version):
So, when the foil is fastened, you should put your flower tub on the place, where you want it to stay, because when you fill it with soil, you never lift it again (of course excluding the case when you eat spinach and become Popeye the sailor:).
You prepare your drain, soil and flowers and start your gardener work:
At the bottom you place drain (in my case some sand with small stones), then you put in enough soil and flowers. Your pallet garden is ready now, just don' t forget to add some water.
You can add a lot of your own creativity to this simple process. And if you have few space (maybe some balcony), you can even make hanging gardens of Semiramis with your own hands:
Add your own creations or ideas. Gardeners of the world will thank you:)


Žádné komentáře:
Okomentovat